- You are here:
- Home »
- Blog »
- Dive Deeper »
- Dry Static Apnea Training To Boost Freediving Breath-hold Times
Dry Static Apnea Training To Boost Freediving Breath-hold Times
If you start to panic as soon as you start to feel uneasy during your breath-hold or when you feel diaphragm contractions; then you’ll burn even more oxygen and cut your breath-hold time shorter.
Experience, meditation, diet, having good equipment etc all contribute toward your relaxation during apnea.
However, one thing that moves the needle more than almost anything else at getting you calm during breath-holds, is dry static apnea training.
Dry static apnea training is a type of breath-hold training for freediving, that is only done on land and without any movement at all. The goal of this type of training is to train your mind & body to stay relaxed during breath-holds, so you consume less oxygen.
Lastly, dry static apnea training is very popular because it can be done without supervision because there is no chance of blacking out underwater and drowning.
Dry static apnea training is a freediver’s “bread & butter” to training breath-holds for deep freedives.
How dry static apnea training will make you a better freediver
Contrary to popular belief: dry breath-hold training does not adapt your body to freedive deeply.
Only deep freediving (experience) can help you with this.
Furthermore: dry static apnea does not train your lungs. Only an Air Restriction Device or lung stretches/sprints will train your lungs.
So what is dry static apnea training good for then?
Dry breath-hold training trains your mind & body to get used to all the obstacles that come from doing breath-holds during freediving.
Apnea training helps with:
- Boosting CO2 Tolerance (staying calm with high CO2 levels in your blood)
- Dealing with low oxygen levels (Hypoxia)
- Diaphragm contractions
- The seemingly overwhelming urge to breathe
- Builds mental fortitude and discipline.
As you can see from the above, dry static apnea training is well worth your time as a freediver.
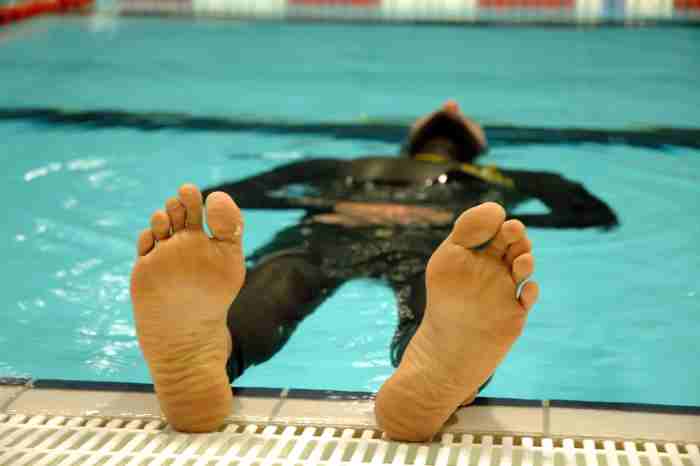
Dry static apnea training can serve as a good replacement to wet statics
How to do dry static apnea training
(This post is not medical advice. It is based on research and experience of myself and other freedivers.
Always practice dry static apnea while laying down eg: on a soft surface like a couch, your floor or a bed. This way if you pass out, you won’t hit your head and injure yourself.)
Step 1: Start by laying down on the ground. I recommend laying on a nice yoga mat like this, but a mat really is optional at the end of the day.
Step 2: Put on some relaxing music. I prefer this song here. The reason you listen to relaxing music is because it helps train your mind to look for distractions so you don’t focus on the discomfort of apnea.
Step 3: Get your phone timer and put it on your desired time with your appropriate CO2 or O2 Table.
Step 4: Do a standard pre-dive breathe-up. In simple terms all you want to do is exhale for twice as long as you inhale. And you do this for about 2 minutes before your apnea training. So if you breathe in for 5 seconds, exhale gently for 10 seconds. Now repeat this for 2 minutes.
Step 5: After your breathe-up, exhale all your air completely out to empty your lungs.
Step 6: Take your last inhale so your lungs are about 95% full of air. Start with your stomach and then fill up your lungs. Don’t over pack or over-inhale. Not only is this bad practice for real breath-hold freediving; but it also causes you to be uncomfortable and breaks relaxation.
Step 7: Start your song, start your timer and make sure you are accustomed to the CO2 table you’re using (more on this below).
Step 8: While holding your breath, close your eyes. Picture yourself in an underwater environment you find relaxing. It could be a fresh water spring, a bright tropical ocean in the Caribbean or your own underwater fantasy land.
Whatever it is, imagine yourself vividly drifting down into it. Come into your senses and pretend you feel the water against your skin, watch the fish darting around. Feel the slight pull and swaying of the ocean.
Step 9: When you start feeling contractions at – say – 1:20 to 1:50; lower your chin down to your chest. This will increase your comfort and is good practice for when you’re diving deep (helps lower the likelihood of injury).
Also, remember with contractions they won’t hurt you nor will anything bad happen because of them. Accept the fact they are uncomfortable…and you will become a lot more comfortable with them.
Step 10: Toward the end of your Dry Static Breath-Hold, imagine yourself swimming back up to the surface.
Step 11: Open your eyes, inhale with 3 – 5 hook breaths (recovery breaths).
What are hook breaths? In simple terms a hook breath is a way of inhaling air, and exerting a downward force so oxygen travels to your brain faster. It’s a good habit to get into after any form of apnea and something all experienced freedivers do after any dive.
To hook breathe: Inhale, push down for 1 second, exhale and repeat. Do this 3 – 5 times.
And that’s the end of the simple yet effective dry static breath-holding technique.
Using this music + visualisation technique, you should be able to hit at least 2 minutes dry static breath-hold straight off the bat and I’d expect more of you to be able to hit 3.5 minutes+ after several practices.
CO2 tables for dry static breath-holds
CO2 tables (Carbon Dioxide tables) are what you use as a guide during static apnea training. The tables let you know how long to hold your breath for vs how long to rest for between breath-holds.
Carbon Dioxide Tables have a structured series of breath-holds that are all the same in duration.
Then between each series of breath-holds, you’re allowed to breathe for a certain amount of time.
The further you go down the table; the less time you’re allowed to breathe between each series of breath-holds.
The benefit of using a CO2 table is that it increases the CO2 levels in your bloodstream.
This then forces your body to adapt and build up your CO2 Tolerance, so you get desensitized to the discomfort of high CO2 levels in your blood (like the overwhelming urge to breathe, diaphragm contractions etc).
This all contributes to making you a more relaxed freediver, with higher breath-hold times.
Below is a CO2 Table example:
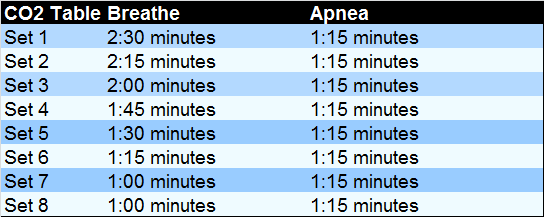
This CO2 Table has a hypothetical personal best breath-hold time of 2 minutes and 30 seconds.
Benefits of dry static apnea training (compared to other apnea training)
There are 3 main benefits of dry static breath-holds:
1. Safety: You’re above water on the land. If you hold your breath for too long and push things too far and pass out, it’s impossible to drown. However, it is important to do dry static breath-holds laying down, so if you do pass out, you won’t hit your head or hurt yourself.
2. You can do them alone: No diving buddies needed. You’re not underwater, so you’re not at risk of drowning if you pass out. This means you can do them completely alone and still be safe.
3. No pool or ocean needed: you can simply do them laying down on the ground at home or on your bed/couch. This makes the activity easily accessible, so you can do it more often.
Although dry static breath-holds have clear benefits; they also come with undeniable downsides…
Disadvantages & limitations of dry static apnea training
1. Doesn’t impact your freediving as much: Dry static breath-holding definitely does train you to cope with the uncomfortable effects of apnea.
However, you’re not practicing it underwater, which means it’s not as related to freediving. Your body won’t get desensitized to apnea underwater as well as it could.
2. Harder than wet statics (so you’ll have lower breath-hold times): You’re not underwater, so you don’t have the breath-holding benefits of the Mammalian Dive Reflex being activated.
This results in shorter apnea times that aren’t comparable to freediving apnea.
How often should you do dry static apnea training?
Try doing dry apnea about 2 – 4 times per week.
After doing it for this length of time, you should see a pretty big increase in your breath-hold times after a week or two.
How to train lungs for freediving
Dry static apnea does not train your lungs for freediving.
You can train your lungs with things like High Intensity Interval Sprints and several types of ‘lung-stretching’ yoga/exercises.
However, by far the most efficient way to train your lung strength so you can inhale more air with less work, is by practicing 2 times per day for 5 minutes with an Air Restriction Device like the Powerlung.
If you want to check out a post I’ve written on Air Restriction Devices for freedivers; click here.
About the Author Gerrie van Niekerk - Apnealogy
Gerrie is a passionate Freediver, Spearfisher, Digital Marketer, and author for the Apnealogy website. Gerrie is an SSI Level 1 certified Freediver who loves geeking out about freediving and spearfishing gear and lives for his family and adventure.

